
Ages: 5+ Est. Time: < 10 mins
Safety
- Beware of fire burn.
- Adult supervision.
- Make sure there are no flammable materials around.
Materials List
- Disposable cup (any small container)
- Water
- Cooking oil
- Cotton rope (braided material)
- Lighter
- Plastic bottle
- Scissors
- Pen
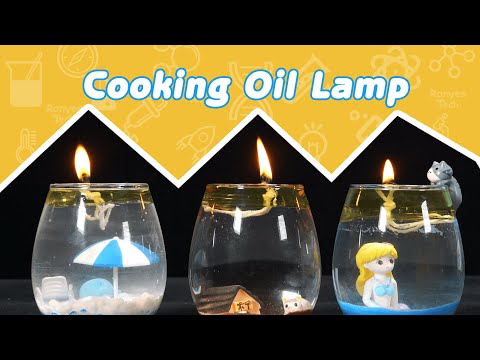
- Cooking Oil Lamp
Instruction
Step 1/5 – cut a circle out of the plastic bottle that is slightly smaller than the mouth of the disposable cup and drill a hole in the center of the circle.
Step 2/5 – Fold the cotton rope to make a thick wick and put it through the hole in the plastic circle.

Step 3/5 – Pour water into the cup and pour the cooking oil on the top.

Step 4/5 – Put the circle with the wick into the cup. The circle should float on the top of the oil with part of the cotton out of the oil. The circle is used to keep the wick out off the oil.

Step 5/5 – Light the wick and you have a cooking oil lamp.

Troubleshooting
Why did my fire go out just after a while?—Make sure you use the braided material as a wick and keep the wick out of the oil.
Scientific Description
Oil is a kind of flammable material. The oil is sucked by the cotton rope because of the Capillary Action. Capillary Action is the ability of a liquid rising up and defying gravity in a narrow room. The oil is burnt at the end of the rope and more oil is sucked there until the oil in the cup is used up and the fire goes out. The Alcohol lamp in the lab shares the same principle, Capillary Action.Extensions
You make a pumpkin oil lamp at Halloween.
How to Make an Oil Lamp?
 Reviewed by Ronyes Tech
on
May 10, 2020
Rating:
Reviewed by Ronyes Tech
on
May 10, 2020
Rating:
Reviewed by Ronyes Tech
on
May 10, 2020
Rating:



Really interesting and simple experiment idea—easy to follow and great for kids learning basic science at home. The step-by-step setup makes the concept of capillary action much clearer in a practical way.
ReplyDeleteIt’s also nice that it uses everyday materials like cooking oil and a cup, which makes it accessible for family activities. The safety reminder is important too, since fire is involved.
Overall, a fun mix of learning and creativity that works well for a quick science project or classroom demonstration.
This is a clever science activity that makes an important concept easy to understand. The instructions are straightforward, and the hands-on approach helps turn a scientific principle into something children can actually observe and explore for themselves.
ReplyDeleteI also appreciate that the experiment relies on common household items, making it simple for families, teachers, or homeschool groups to recreate without needing specialized equipment. Activities like this are a great way to spark curiosity and encourage young learners to ask questions about how things work.
The inclusion of safety guidance is especially valuable, as it helps ensure the experiment can be carried out responsibly while still being engaging and educational.
Thanks for sharing this project—it’s an excellent example of how simple experiments can make science both accessible and enjoyable for learners of all ages.
This is a clever science activity that presents an important concept in a clear and approachable way. The step-by-step instructions are easy to follow, and the hands-on format helps learners directly observe and understand the idea rather than just reading about it.
ReplyDeleteIt’s also great that the experiment uses everyday household materials, making it accessible for families, classrooms, or homeschool settings without the need for special equipment. Activities like this are especially effective for sparking curiosity and encouraging children to think more deeply about how things work.
The attention to safety is another strong point, helping ensure the experiment can be done responsibly while still keeping it fun and engaging.
Overall, this is a great example of how simple, practical experiments can make science more engaging and easier to understand for learners of all ages.